2017/03/22

How to load test files when testing in android's application

About

Recently, I am writing test cases for my android project. At some point, I need to load (or installed) some data files to run my tests. Documentations in this area scatter everywhere. So, I tried to summarize them here.
NOTE: Assume you are running android’s test cases with Espresso.

Files will be used on Local unit test or instrumented test?

Please read the official document here if you are not familiar with either or both of the terms Local unit test and Instrumented test. In short, the former one runs tests without a need for android simulator while the later one does.

With Local unit test

Although I have not coded such kind of test cases yet, I believe answer here shows where to put the fixtures which is package under app/src/test/resources/.
Then, you can load the fixture via getClass().getResourceAsStream("testFile.txt") as illustrated in the link.

With Instrumented test

Put files under app/src/androidTest/assets. For example, I have 2 PDF files one.pdf and two.pdf.
PROJECT/app/src/androidTest/assets/one.pdf
PROJECT/app/src/androidTest/assets/two.pdf
Getting a file stream, for example one.pdf, first.
InputStream input =
InstrumentationRegistry.getContext().getResources().getAssets().open(
"one.pdf"
);
As I am testing a function of picking a PDF which get an intent from any file choosers. In order to do simulate such intent, I need to COPY the PDF file into some where so that the application under test is able to access first.
// Convert Asset to File by copying such file to our cache directory
File f2 = new File(InstrumentationRegistry.getTargetContext().getCacheDir() +"/one.pdf");
writeBytesToFile(input, f2);
where writeByteToFile is
    private static void writeBytesToFile(
        InputStream is,
        File file
    ) throws IOException{
        FileOutputStream fos = null;
        try {
            byte[] data = new byte[2048];
            int byteRead;

            fos = new FileOutputStream(file);

            while((byteRead=is.read(data)) > -1){
                fos.write(data, 0, byteRead);
            }
        }
        finally{
            if (fos!=null){
                fos.close();
            }
        }
    }
If you are confused with getContext and getTargetContext, read the answer from Stackoverflow here
Pack the file with an URI such that an intent can carry on after copying.
// Get an uri from such file object
Intent i = new Intent();
i.setData(Uri.fromFile(f2));

// Return the simulated intent
return new Instrumentation.ActivityResult(Activity.RESULT_OK, i);
Note that schema of such URI is file://. However, the schema of an URI sources from a real device is content://.
Done.
Finally, assertions on added PDFs can be made.
// Verify the contents
onView(withText(PDF_ONE)).check(matches(isDisplayed()));
onView(withText(PDF_TWO)).check(matches(isDisplayed()))

Show me source code

Welcome to read the full source code here.

Reference

2017/03/18

Difference for option -I of xargs between MAC and Linux

About

Last night, I found that there was a problem on running below script on MAC when I am updating npm’s packages with my dotconfig which works perfectly on Linux.
paste -d' ' -s "$BASEDIR/packages.txt" | \
    xargs -I{} sh -c "echo npm install -g {}; npm install -g {} || exit 255"

Debugging

So here is the content of packages.txt.
eslint@^3.x
babel-eslint@^7.x
eslint-plugin-jsx-a11y@^4.x
eslint-plugin-import@^2.x
eslint-plugin-react@^6.x
eslint-config-airbnb@^14.x
eslint-config-eslint@^4.x
grunt-cli@^1.x
bower@^1.x
phantomjs-prebuilt@2.x
Script (under linux platform) will first echoes following and then install packages as below statement.
npm install -g eslint@^3.x babel-eslint@^7.x eslint-plugin-jsx-a11y@^4.x .....
However, it simply echoes above statement without installing any packages. Therefore, I have tried the 2 statements (paste and xargs) separately. paste works perfectly so that’s the problem of xargs.
After reading man page of xargs in MAC, there is a fundamental difference on -I‘s implementation. Replacements for MAC’s xargs will be executed only if length of the target line is below 255 while Linux one does not has such limitation.
In MAC,
     -I replstr
             Execute utility for each input line, replacing one or more occurrences of replstr in up to
             replacements (or 5 if no -R flag is specified) arguments to utility with the entire line of
             input.  The resulting arguments, after replacement is done, will not be allowed to grow beyond
             255 bytes; this is implemented by concatenating as much of the argument containing replstr as
             possible, to the constructed arguments to utility, up to 255 bytes.  The 255 byte limit does
             not apply to arguments to utility which do not contain replstr, and furthermore, no replacement
             will be done on utility itself.  Implies -x.
In Linux,
       -I replace-str
              Replace occurrences of replace-str in the initial-arguments
              with names read from standard input.  Also, unquoted blanks do
              not terminate input items; instead the separator is the
              newline character.  Implies -x and -L 1.

Solution

Actually, I have failed to find an alternative in MAC. So I simply split the statement into two.
paste -d' ' -s "$BASEDIR/packages.txt" | \
    xargs -I{} sh -c "echo npm install -g {}"
paste -d' ' -s "$BASEDIR/packages.txt" | \
    xargs -I{} sh -c "npm install -g {} || exit 255"

2017/03/03

Ways on adding DNS servers in Ubuntu

DNS stands for domain name system (Just in case you have no idea what DNS is). This is a system for mapping a hostname and IP address back and forth.
Here are ways for configuring DNS manually in Ubuntu
Background
  • OS: Ubuntu 16.04
1. Edit /etc/hosts
Manually define a static mapping between host and IP address. Although this is the simplest way to do the resolving work, in my opinion, try to avoid editing this file as this is the job of DNS.
For example, given following /etc/hosts
127.0.0.1 localhost
127.0.1.1 ubuntu-server
10.0.0.11 server1
You have added 3 hostnames. When you run command like ping you host is able to resolve the hostname properly.
--- PING localhost (127.0.0.1) 56(84) bytes of data. ---
64 bytes from 127.0.0.1: icmp_seq=1 ttl=64 time=0.027 ms
64 bytes from 127.0.0.1: icmp_seq=2 ttl=64 time=0.024 ms
64 bytes from 127.0.0.1: icmp_seq=3 ttl=64 time=0.029 ms
64 bytes from 127.0.0.1: icmp_seq=4 ttl=64 time=0.023 ms
2. Edit /etc/networks/interfaces
Please read my previous blog here. Devices defined here will not be managed by Network Manager below.
3. Network Manager (Recommend)
This is the recommended way for adding DNS in Ubuntu.
In GUI way, you can open network manager in your desktop’s top right hand corner.
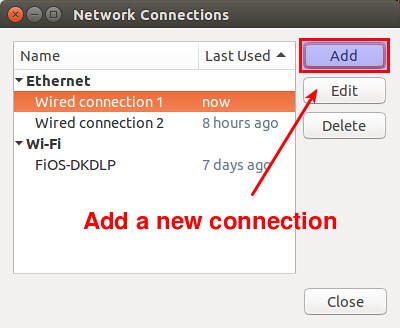
Click Edit Connections.
Click Add if you would like to create a new profile. Otherwise, pick a profile and Click Edit
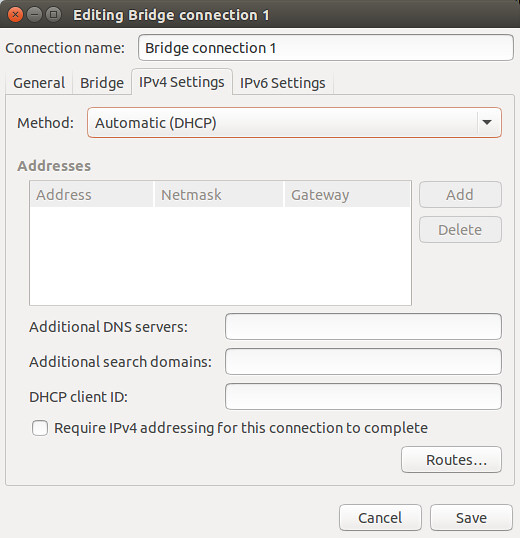
Click to IPV4 Settings tab and add DNS in Additional DNS servers
For example, 8.8.8.8 or multiple 8.8.8.8 8.8.4.4.
In terminal way, you can edit files in /etc/NetworkManager/system-connections.
root@mondwan-VirtualBox:/etc/NetworkManager/system-connections# cat a_custom_profile
[connection]
id=a_custom_profile
uuid=22e9568c-7a0d-3a88-a84d-1e2c0b1708b7
type=ethernet
autoconnect-priority=-999
permissions=
secondaries=
timestamp=1488624882

[ethernet]
duplex=full
mac-address=08:00:27:EB:EB:5B
mac-address-blacklist=

[ipv4]
dns=8.8.8.8;8.8.8.4;
dns-search=
method=auto

[ipv6]
addr-gen-mode=stable-privacy
dns-search=
ip6-privacy=0
method=auto
Above is a profile named as a_custom_profile and there is an entry ipv4.dns for your DNS.
References: